
Week 9: Live Population Tracker
Assignment Description
For this week’s assignment, we worked in groups to program microcontrollers to obtain and respond to information from the internet or radio. The project requirements included implementing at least one input and one output component.
Project Overview: Live Population Tracker
Our team developed a real-time population tracker and visualizer that connects to a custom API to display current global population data. The project combines web scraping, cloud hosting, and IoT visualization to create an interactive population monitoring system.
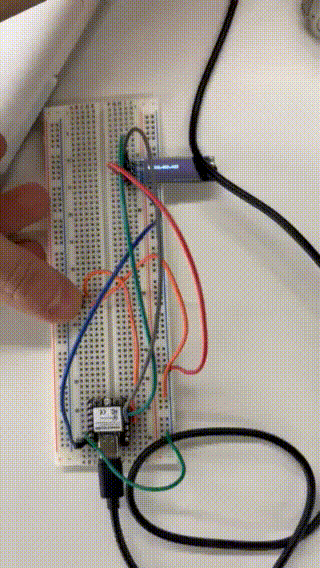
Live Population Tracker in Action
Technical Implementation
1. Custom API Development
After encountering challenges with deprecated public APIs that only provided simulated data, we developed our own solution:
- Created a custom web scraping system to gather real population data
- Implemented and hosted the API server on AWS
- Established reliable endpoints for real-time population queries
2. Microcontroller Integration
We utilized a Seeeduino microcontroller with WiFi capabilities to interface with our API:
- Implemented secure WiFi connectivity
- Developed robust JSON parsing for API responses
- Created an efficient data update system triggered by user input
3. Visualization System
The project features an OLED display system for data visualization:
- Utilized a 128x32 OLED display for clear data presentation
- Implemented a button-triggered update mechanism
- Created a clean, readable display format for population numbers
Code Implementation
Below is the core implementation of our population tracker:
Click to see the microcontroller code
#include <SPI.h>
#include <Wire.h>
#include <WiFi.h>
#include <HTTPClient.h>
#include <ArduinoJson.h>
#include <Adafruit_GFX.h>
#include <Adafruit_SSD1306.h>

#define SCREEN_WIDTH 128
#define SCREEN_HEIGHT 32
#define OLED_RESET     -1
#define SCREEN_ADDRESS 0x3C

// WiFi credentials
const char* ssid = "MAKERSPACE";
const char* password = "12345678";

// API endpoint
const char* apiEndpoint = "http://3.17.189.89:8080/population";

// Population tracking
unsigned long lastPopulationFetch = 0;
const unsigned long fetchInterval = 86400000; // 24 hours

Adafruit_SSD1306 display(SCREEN_WIDTH, SCREEN_HEIGHT, &Wire, OLED_RESET);

const size_t capacity = JSON_OBJECT_SIZE(200);

int buttonPin = D3;
int buttonState = 0;

void setup() {
  Serial.begin(115200);

  // Connect to WiFi
  WiFi.begin(ssid, password);
  while (WiFi.status() != WL_CONNECTED) {
    delay(500);
    Serial.print(".");
  }
  Serial.println("\nWiFi connected at:");
  Serial.println(WiFi.localIP());

  // Initialize the display
  if (!display.begin(SSD1306_SWITCHCAPVCC, SCREEN_ADDRESS)) {
    Serial.println(F("SSD1306 allocation failed"));
    for (;;);
  }

  display.clearDisplay();
  display.setTextSize(1);
  display.setTextColor(SSD1306_WHITE);
  display.setCursor(0, 0);
  display.println("Connecting to API...");
  display.display();

  // Initial population fetch and display
  fetchPopulation();

  pinMode(buttonPin, INPUT_PULLUP);
}

void loop() {
  handlePopulation();
}
Technical Challenges and Solutions
1. API Development
- Challenge: Existing APIs provided outdated or simulated data
- Solution: Developed our own API with real-time web scraping and AWS hosting
2. JSON Parsing
- Challenge: Initial difficulties with ArduinoJson deserialization
- Solution: Implemented proper JSON document sizing and error handling
3. Display Updates
- Challenge: Balancing update frequency with API calls
- Solution: Implemented button-triggered updates to prevent excessive API requests
Future Improvements
- Add historical data tracking and visualization
- Implement regional population breakdowns
- Add trend analysis and prediction features
- Create a more sophisticated display interface with multiple data views